Rustic Concrete Wood Instructions
Personal Protection
It’s always recommended to wear the appropriate Personal Protective Equipment (PPE) for the task at hand and follow your employer’s safety policy. Commonly known PPE such as safety glasses, gloves, earplugs, respirators, etc, are recommended as needed.
For further information on OSHA requirements, visit osha.gov
Prep
(For in-depth instructions, see Prep Manual)
- Prep surface to be coated by shot blasting/grinding/acid washing, etc...
- Use appropriate TCP repair products to fill holes, cracks & control joints
- Thoroughly clean surface
- Protect surfaces not to be coated using specialty tape, paper, plastic, etc...
Grout Coat
- Set up mix station
- If spraying, set up and test spraying equipment
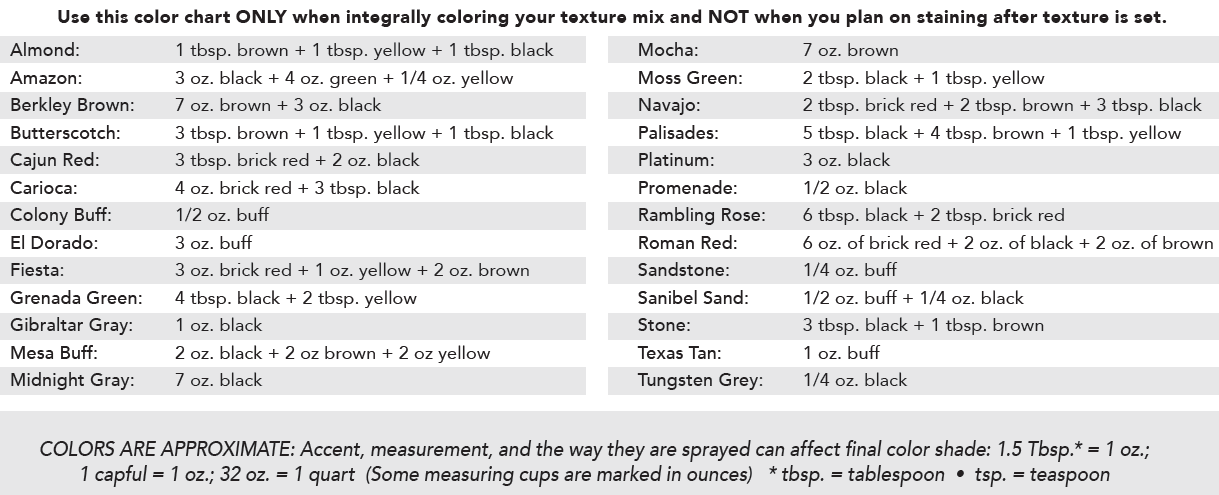
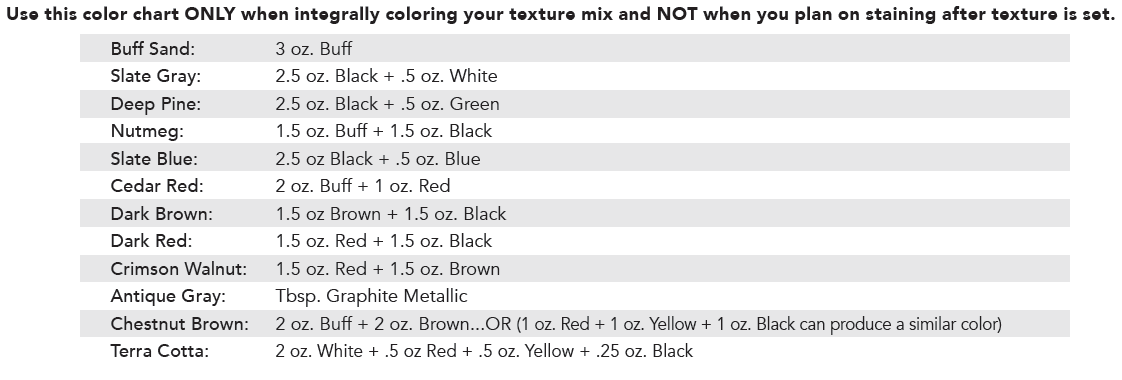
- Using “mixed” HD Resin (1:1 with water), combine “mixed resin” (7-9 Qts.), texture mix (1 Bag), and mineral pigment for desired color. Mix for 3-5 minutes
- Using a magic trowel, or hopper spray gun, apply grout coat over surface
- Let dry
- Address imperfections in grout coat by scraping
- Using stencil tape, tape out design
Texture Coat
- Using “mixed” HD Resin (1:1 with water), combine “mixed resin” (7-9 Qts.), texture mix (1 Bag), and mineral pigment for desired color.
- Mix for 3-5 minutes
- Using a magic trowel, or hopper spray gun, apply texture coat over 3-4 “planks” at a time, adding wood grain appearance with angled broom, (knots should be added at this time, if desired). Repeat until entire surface is covered
- Let dry
- Address imperfections in texture coat by scraping
- Pull tape
- Remove all dirt and debris from floor
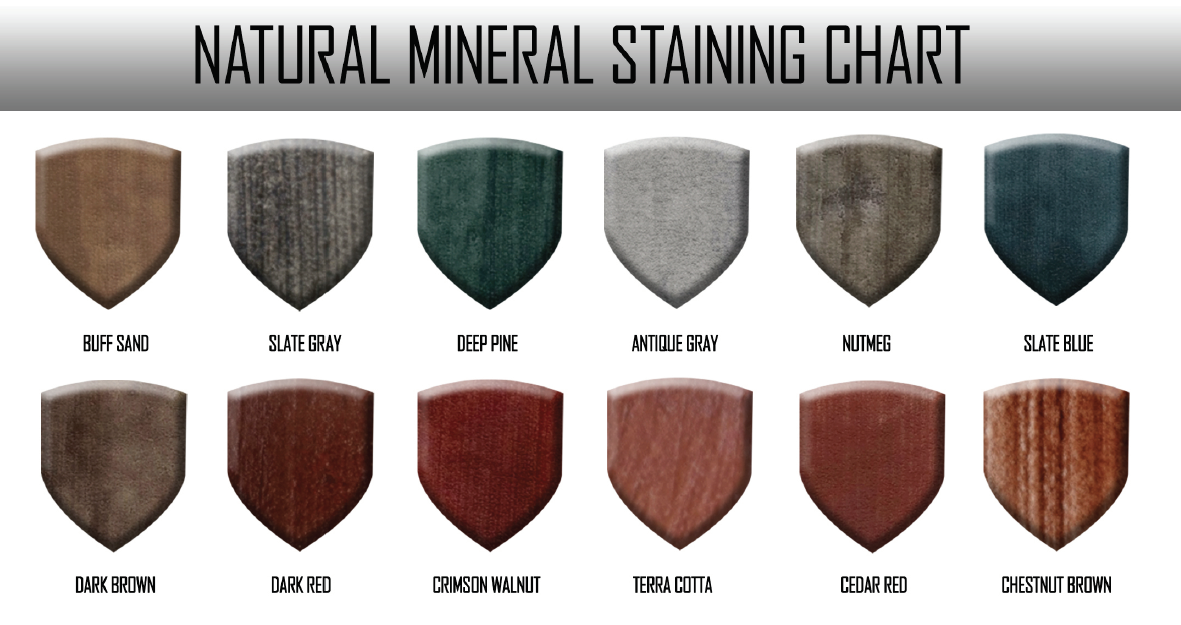
- Apply stain using desired technique
- Let dry
Sealing
Interior
- Apply Neat Coat Epoxy (2 Parts A to 1 Part B)
- Apply desired top coat (Optional)
- Remove all protective specialty tape, paper, plastic, etc
- Make sure project area is clean, presentable, and free from debris
Exterior
- Apply Acrylic Sealer
- Apply 2nd coat of Acrylic Sealer
- Remove all protective specialty tape, paper, plastic, etc
- Make sure project area is clean, presentable, and free from debris
Products & Coverages
- Appropriate Concrete Protector repair products (see repair manual)
- Concrete Protector Texture Mix (150-250 sq. ft. per bag./*Dry Time= 1-6 hours.) - DM-3913
- Concrete Protector HD Resin (Mixes 3-5 bags of texture mix) - DM-5406
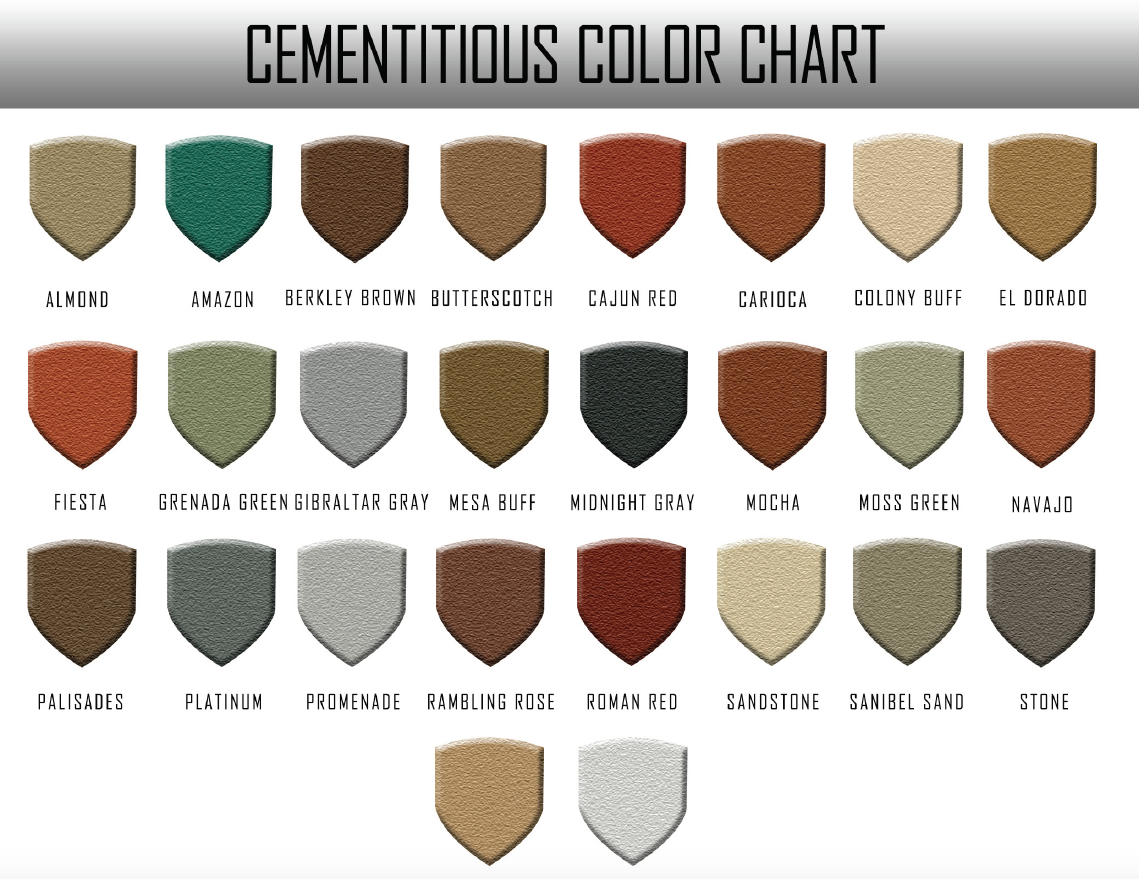
- Concrete Protector Mineral Pigment Colorants (1-7 oz. per bag) - DC-2022/DC-2055
Sealer Options
- Barricade 50 Acrylic (mixed 1:1 with approved solvent, 140-200 per. sq. ft. per gal./ *Dry time= 1-3 hrs.) - SE-2807
- Acrylic Shield 25 (140-200 sq. ft. per gal./ *Dry Time= 1-3 hrs.) - SE-2803
- Epoxy Neat Coat (55-120 sq. ft. per gal./ *Dry Time = 8-16 hrs.) - EN-6303
- WB 421 Gloss** (175 -500 sq. ft. per gal./ *Dry Time = 5-7 hrs.) - UT-4501
- WB 221 Satin** (175 - 500 sq. ft. per gal./ *Dry Time = 5-7 hrs.) - UT-4499
- SLV Poly 90**(175 - 250 sq. ft. per gal./ *Dry Time = 4-8 hrs.) - UT-4513
- High Noon Acrylic Floor Finish** (1500 - 3000 sq. ft. per gal./ *Dry Time = 1-2 hrs.) - TJ-3113
- Satin Armor Acrylic Floor Finish**( 1500 - 3000 sq. ft. per gal./ *Dry Time = 1-2 hrs.) - TJ-3125
** Used as an optional top coat with Neat Coat Epoxy
* Coverages and dry times vary depending on application techniques and temperature. Estimations are based on 70 degrees, 30 percent relative humidity. For more information, refer to TDS sheets.
Tools
- Stencil Tape - TP-7517/TP-7521
- 2” Green Specialty Tape - TP-7507
- Mixing Tarps - TL-7235
- Drill Mixing Stand - MX-3253
- Hand Held Mixer - MX-3251
- Mixing Paddle - MX-3245
- ¾” Nap Jumbo Roller Cover - RL-4321
- HD Jumbo Frame - RL-4303
- Assorted Mixing Containers and Cups - TL-7361/TL-7365
- 4”,9”, or 18” Roller Frames - RL-4325, RL-4335, RL-4319
- 4”, 9”, or 18” ⅜” Nap Roller Covers - RL-4323, RL-4341, RL-4313
- Threaded and Tapered Roller Poles - TL-7393, TL-7395
- 2” Chip Brushes - RL-4343
- 16” Stand Up Metal Scraper - TL-7107
- Gloves - ET-7323
- Large Low Viscosity Wand (for mixing epoxy) - TL-7127
- ⅛” Notched Squeegee - ET-7255
- Magic Trowel (18” is a popular size) - TL-7103
- WTF Top Coat Roller - TCR-1001
- Roller End Caps - RL-4317
- 18” Paint Tray - RL-4309
- Spiked Shoes - TL-7353, TL-7349
- Pail Opener - TL-7303
- Low-Speed Drill
- Angled Broom
- Tape Measures or Pre-Cut Jigs
- 5 Gallon Mixing Buckets
Cost & Pricing
- Typical Product Cost: $1 - $2 per sq. ft.
- Typical Pricing: $8 - $12 per sq. ft.
Benefits & Features
- Super Durable & Easy To Maintain
- Indoor / Outdoor Installations
- Unlimited Color Selections
- Not affected by floods if installed in a basement
- Perfect to be installed overheated slab applications.
- Great for people with big pets
- Environmentally Friendly & Sustainable
- Application temperatures between 55-95 degrees
The Concrete Protector is “The Originator” of the Rustic Concrete Wood system . . . definitely the HOTTEST decorative concrete resurfacing system in the world!! This system provides the timeless look of hardwood floors with the durability of concrete.
Our Rustic Concrete Wood System starts with an industrial cementitious coating that is actually stronger than concrete itself. We use a combination of taping, troweling, and staining techniques to give the rich feel of reclaimed hardwood.
Our system actually gives you grain, knots, and nail holes that you can actually feel. We have witnessed many people on their hands and knees because they couldn’t believe it wasn’t real wood. A wide selection of stains allows for concrete wood in any color imaginable, from rustic to super modern.
With Rustic Concrete Wood, you don’t have to worry about moisture damage or other problems associated with laminate surfaces. Our sustainable, pet-friendly coating can permanently transform any basement, family room, patio, porch, garage floor, showroom, or commercial space. This system is excellent for restaurants and even floors that handle vehicle traffic!
This popular process will amaze everyone that enters your business or home. Options include additional slip resistance, gloss or satin topcoats to simulate natural marble finishes. The results are amazing! The beauty of this floor will enhance your business or home like no other.
Tips & Tricks
Resin
Make sure you use cool water to mix your resin (don’t use water that has been baking in the sun all day from a garden hose). Hot mixed resin = faster texture = less fun 😃
Mixed Resin = 1:1 mix of concentrated HD Resin + Water.
When making “Mixed Resin”, do not spray the top of the resin from the nozzle of a garden hose (this will cause the resin to foam and it will take longer to fill properly).
Tools & Masking
Keep your magic trowels clean. Designate certain trowels for texture and other trowels for epoxy. Magic trowels with dried epoxy or texture on it will not allow you to put your texture down as smooth as possible.
When masking walls, use painter’s tape along the base molding (approximately 1/16” up from the floor). Run ½” stencil tape on top of the base of the painter's tape (this fiber reinforced tape makes it easier to pull tape when finishing up).
Grout Coat
When applying grout at the recommended square footage, when it is dry, it should feel like sandpaper. Also, DO NOT apply too thick (trying to create “build”) with this coat. This texture, at this viscosity, is NOT meant to fill or be applied thick.
Wait until the grout coat is completely dry before attempting to design your wood planks with stencil tape. On interior projects, this means waiting until the next day.
Design
To keep things random, use three different sized jigs (pre-cut paint sticks or wood trim pieces) to quickly measure each plank. 7”, 9” & 11” jigs are three example combinations for varied plank sizes. Use random sizes to keep things stress free (and looking natural).
Write sizes on your wooden jigs. If doing 7, 9, and 11-inch width planks . . . write 7, 9 and 11 on your measuring sticks with a black magic marker. You’ll want to have two of each size (one set for each worker designing the planks).
End of planks/cross pieces: Randomly place tape ¾ of the way across the plank/tape to create the end of planks.
When taping and walking back toward your helper, you’ll want to walk on the tape line to tack it down.
Use a 4” or 6” mini roller frame + cover on a broom handle (roller cover has tape wrapped around it to stiffen it) and roll up and down the tape line to tack the tape down tightly to the grout coat. Don’t roll before walking down the tape first (the line can get wavy if you don’t walk on it first).
Texture Coat
Magic trowel technique: Using a magic trowel, or hopper spray gun, apply texture coat over 3-4 “planks” at a time, adding wood grain appearance with modified angled broom (knots should be added at this time, if desired).
When using an angled broom, it is essential to first cut the soft-bristled ends (the “fuzzy” part of the broom) off with scissors. You need the stiffness of the upper bristles to make the grain impression.
For the alternative Hand Troweling Method/ “Rough Cut” or “Rough Hewn” Rustic Wood, check out our course on Decorative Concrete University.
Repeat until entire surface is covered
There is no need to put down pressure on the angle broom. The weight of the broom is all you need. Make sure not to drag excess texture to the ends of your boards. Don’t try to get fancy and “artistic” here with the angle broom. Just walk straight.
When brooming texture across the floor, continue until you are several feet away from a wall and pick up on the broom. Put the broom against the other wall and broom back into AND past where you just textured and pick up on the broom.
Creating Knots
LESS IS MORE when it comes to making knots!
With a 2” brush, twirl, then extend the markings above and below the knot (study the way real wood knots look and you’ll know what we’re getting at) or you can stab the wet texture with brush and do a quick twist in one direction . . . There really is no wrong way to do this . . . ugly knots look good when Stained! Smaller knots look better than bigger knots.
Alternative Hand Troweling Method/ “Rough Cut” or “Rough Hewn” Rustic Wood. Check out our courses on Decorative Concrete University
Scraping & Pulling Tape
SCRAPE IN THE DIRECTION OF THE WOOD GRAIN!
When removing tape, put pressure and pull on the tape towards you as you lift up the lines of tape. IF you pull/bend the tape over against the texture, you will leave many strands of tape
fiber embedded (and you’ll have to spend a bunch of time trying to scrape it out).
If creating nail holes at the end of your planks, now is the time to do so.
When sweeping and vacuuming up the debris from scraping and pulling tape, DO NOT ROLL YOUR VACUUM across the floor. You may (and probably will) leave marks across several planks if you do. PICK UP the vacuum, set it down and repeat this process as you need to.
Staining
Staining the whole floor by hand looks the most realistic.
Here is one stain formula to follow:
On your main color of the floor, hand stain approximately 70% of the floor with 4 parts water to 1 part Classic Rustic Concrete Wood Stain. Walking around in your socks and moving around to random boards (while having your stain in a 16oz squat cup) is the way to go. On 15 % of the floor, dilute the stain concentrate 6 parts water to 1 part concentrate stain (for lighter colored boards). On the remaining 15% of the floor, mix up a new batch of stain at 3 parts water to 1 part concentrate stain (and apply a bit heavier) for darker colored boards. Bark Brown can be used as well for darker boards (or use a mix of 50/50 Classic Rustic Concrete Wood Stain + Bark Brown).
Use a quality paint brush to stain. A 3” paint brush is a good size to utilize.
With the corner of your brush, soak up some stain and then let it drip into your knot texture. This puddled stain will randomly flow around the knot texture and dry darker than the rest of the board.
Sealing
Exterior Sealing
Work in smaller areas. Roll out sealer and then crosshatch without redipping. “Thin to win”.
Seal when surface temps are steady or going down (evening is typically a good time to seal). When slab temps are increasing, concrete is breathing out and bubbles can happen. When slab temps are decreasing, concrete in breathing in / sucking the sealer into it.
If you see “spiderwebbing” in the acrylic sealer while rolling, in means that area is already drying or your roller is dry
Wait until the first coat is not sticky to do the second coat (you don’t want to step in sticky sealer and cause discoloration or damage to your uncured coating.
Interior Sealing
The MOST IMPORTANT TIP: “OUT OF THE BUCKET AND ONTO THE FLOOR.” Leaving the epoxy too long in the bucket will cause it to heat up and start smoking. DO NOT POUR HOT EPOXY ON YOUR PROJECT.
Use The Concrete Protector’s large low viscosity mixing wand for mixing Neat Coat Epoxy. This is the correct mixing wand to ensure that you are not whipping air into your epoxy.
Whenever you break a kit, you must premix Part A for 3 minutes BEFORE pouring out of the bucket.
1.5 - 3 mixed gallons at a time is a typical amount to work with.
Do not use a high-speed drill. Do not mix so fast that you get the “tornado effect” in the product as it spins around the bucket (at this speed, you may suck air down into the epoxy . . . potentially entrapping it and possibly causing bubbles).
Make sure the room is at a steady temperature or the temperature is on the decrease when applying the epoxy. A room with floor temps rising while curing may cause the slab to breathe out and possibly cause outgassing bubbles.
Do whatever it takes to control room temps. If it means putting aluminum foil on the windows to block and reflect the sun, then do it.
Use the appropriate labor force for the job that you’re doing. Most residential projects may require 3 workers. One person dedicated to mixing only. One person as your “runner”, taking buckets of mixed epoxy from the mixing area to the floor, and one person as the main applicator/finisher.
Make sure you have a “mixing bucket” and a” job bucket”. When mixed epoxy is poured into your job bucket, make sure that the job bucket is sitting on a clean surface.
IF wearing spiked shoes when applying your epoxy, make sure you are wearing dull or rounded spikes. Sharp spikes + a heavy installer = floor damage. Consider investing in rubber sport cleats if you need to walk in your epoxy while installing.
Repairs if needed:
Scratches: Using a non-scratch Scotch Brite pad, rub surface, then clean to see if that removes the scratch. You may then have to “spot wax” with our acrylic floor finish (High Noon or Satin Armor Floor Finish) . . . only if necessary.
If there is a deeper scratch and the Scotch Brite pad/wax doesn’t do the trick, use 220 grit sandpaper or screen (or higher) to lightly sand the spot/area then 1 - 3 coats of acrylic floor finish.
If damage occurs through your top seal coats and into your texture coat, a furniture wood stain pen is a good tool for stain touch-ups.
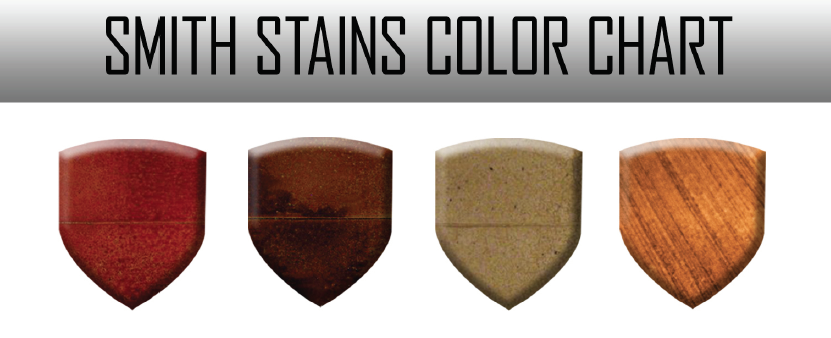
Color Charts
