Concrete Repair
Personal Protection
It’s always recommended to wear the appropriate Personal Protective Equipment (PPE) for the task at hand and follow your employer’s safety policy. Commonly known PPE such as safety glasses, gloves, earplugs, respirators, etc, are recommended as needed.
For further information on OSHA requirements, visit osha.gov.
Prep
(For in-depth instructions, see Prep Manual)
- Prep surface to be repaired by grinding/shot blasting/acid washing, etc...
- Thoroughly clean surface
Quick Patch Step-by-Step
- Set up mix station
- Pre-mix Part A and Part B by shaking the jugs vigorously
- Mix together vigorously (1 Part A to 1 Part B)
- (Optional) Add desired amount of CP Texture Mix (1-3 parts), mix vigorously for 20 sec.
- Pour into spalling, cracks, holes, pops and chips to overflowing
- Let dry
- Using a 4’-7” grinder, grind the repair to an even, flush surface
Quick Patch Benefits & Features
- Tensile Strength = 2200 psi
- Compression Strength = 4750 psi
- Pot Life = 1-5 min.
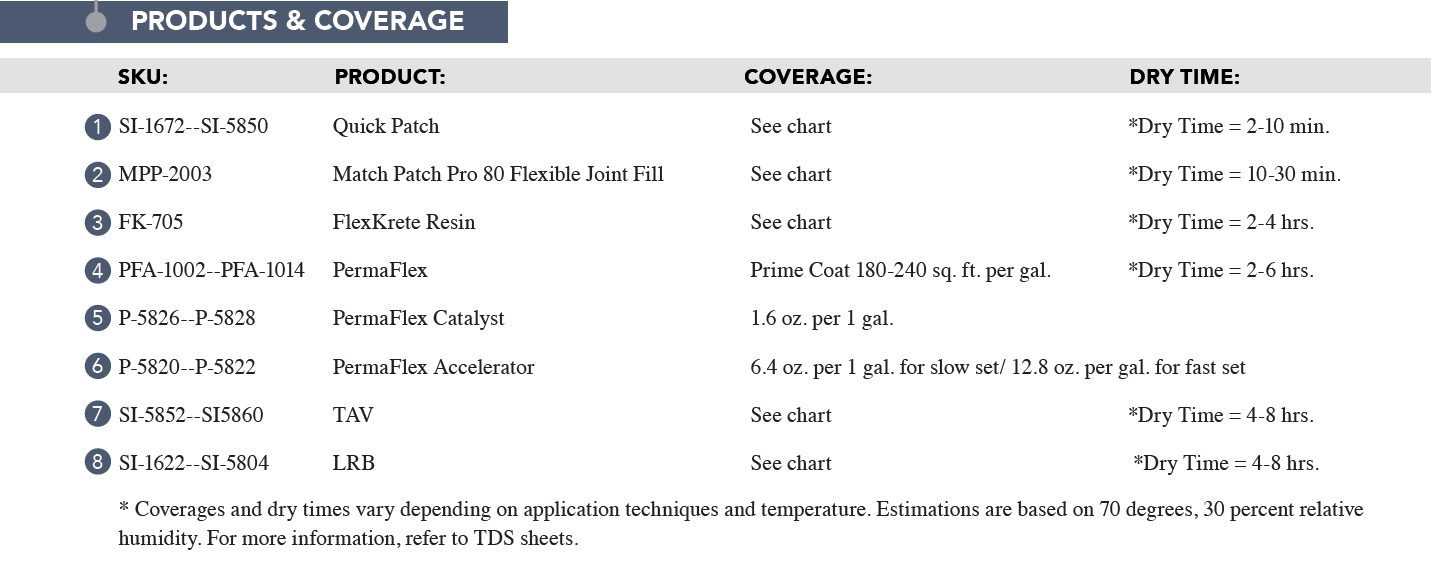
- Dry Time = 5-10 min.
World of Concrete’s Most Innovative Product for 2016
Quick Patch Products & Tools
- Quick Patch - SI-1672/SI-5850
- Concrete Protector Texture Mix - DM-3913
- Mixing Tarps - TL-7235
- Assorted Mixing Containers and Cups - TL-7361/TL-7365
- Gloves - ET-7323
- T-Cup Wheel - DCW-8731/DCW-8755
- Hum-B Grinder - PB-7169
- Stir Sticks
Quick Patch Tips and Tricks
- QUICK PATCH: Only mix up small amounts of Quick Patch at a time (typically measure out 4 oz of Part A and mix with 4 oz of Part B) but quickly and thoroughly. Mix no more material than can be used within one minute (Quick Patch will cure quickly).
Protector-Flex Joint Fill Step-by-Step
- Set up mix station
- Pre-Mix Part A and Part B
- Mix together (1 Part A to 1 Part B)
- (Optional) Add desired amount of CP Texture Mix (1-3 parts), mix until well blended
- Pour into control joints until minimal overflowing, broadcast sand on repair
- Let dry
- Using a 4”-7” grinder or razor scraper, grind or scrape the repair to an even, flush surface
Protectorflex Joint Fill Benefits and Features
- Meets or Exceeds VOC Standards
- Elongation = 70%-85%
- 100% Solids
- Meets USDA Standards for Federally Inspected Facilities
- Temperature Range = 50-99 degrees F
Protector-Flex Joint Fill Tips & Tricks
- PROTECTOR-FLEX JOINT FILL: Unlike Quick Patch, this product is very slow. It is recommended to use Protectorflex Joint Fill after prep is done and you are not coating until the next day (the colder the slab, the slower the set).
Match Patch Pro 80 Flexible Joint Fill Step-by-Step
Make sure caulk gun is always facing tip down throughout process
- Set up Mix Station
- Shake cartridge vigorously for 2 min.
- Insert cartridge unto dual caulk gun and twist on element static mixer
- Tilting down, pump caulk gun until material is dispersed through the element static mixer
- Place 3 pumpfulls of material into a container, discard
- Pump into control joints/ cracks until overflowing
- Let dry
- Using a razor scraper, scrape the repair to an even, flush surface
*** If using a joint pump gun, follow the manufacturer’s instructions
Match Patch Pro 80 Flexible Joint Fill Benefits & Features
- Temperature Range = 20-135 degrees F
- Dry Time = 10-30 min.
- Elongation = 250%
- Tensile Strength = 2000 psi
- Tear Strength = 250 pli
World of Concrete’s Most Innovative Product for 2019
Match Patch Pro 80 Flexible Joint Fill Products & Tools
- Match Patch Pro 80 Flexible Joint Fill
- Dual Caulk Gun
- Element Static Mixer
Match Patch Pro 80 Flexible Joint Fill Tips & Tricks
- MATCH PATCH PRO 80 JOINT FILL: Carry extra rags to catch and clean up any drips. Make sure caulk gun is always facing tip down throughout process.
FlexKrete Step-by-Step
- Set up mix station
- (Optional) FlexPrime: Mix 1 Part A and 1 Part B, apply extremely thin with brush
- Pre-mix FlexKrete Resin
- Mix measured amount of FlexKrete Resin and FlexKrete Catalyst for 30 sec.
- Add desired amount of dry sand (1-3 parts) and/ or fumed silica (1-3 parts), mix for 60 sec.
- Fill, pat, or trowel flush into void and sprinkle with dry sand
- If necessary, using a 4”-7” grinder, grind repair to an even, flush surface
FlexKrete Benefits & Features
- Tensile Strength = 3530 lb/in2
- Compressive Strength = 10,000 psi
- Can easily be applied vertically
- Great for bridge and street repair
- Can be used as a “stand alone” product
FlexKrete Products & Tools
- Mixing Tarps - TL-7235
- Assorted Mixing Containers and Cups - TL-7361/TL-7365
- Gloves - ET-7323
- FlexKrete Resin - FK-705
- FlexKrete Catalyst - FK-701
- FlexPrime - FK-711
- Fumed Silica - FK-717
- Mixing Paddle - TL-7127
- Solvent (for cleaning) - CT-1013/CT-1035
- Variable Speed Drill
- Dry Sand
- Metal Hand Trowel
- Putty Knife
FlexKrete Fill Tips & Tricks
- FLEXKRETE: You have to mix in the FlexKrete catalyst BEFORE adding sand/aggregate, failing to do this will result in the product not setting. The sand/aggregate MUST BE DRY AND FREE OF MOISTURE (use kiln-dried sand and NOT PLAY SAND), failing to follow this will result in the product not setting.
Moisture in the repair area will have the same results as adding wet sand, so it may be advised to torch the repair area to drive away any moisture.
FlexKrete may be sticky to trowel but misting your trowel with acetone will make troweling much easier.
LRB/TAV Step-by-Step
- Set up mix station
- Prime surface/sides of joints or cracks with PermaFlex
- Let dry
- Pre-mix LRB and TAV
- Mix TAV and LRB (1 Part TAV to 2 Parts LRB) until blended
- Fill in void by using a squeegee, trowel, or freezer bag
(if filling a wall/floor junction or wall/wall junction - forming a 1” diameter bead) - (Optional) Using a brush dipped in xylene, smooth out rough edges
LRB/TAV Benefits & Features
- Tensile Strength = 3200 psi
- Elongation = 600%
- Can be applied at any thickness
- Great for waterproofing applications
- Can be used for wooden decks and swimming pools
LRB/TAV Products & Tools
- Mixing Tarps - TL-7235
- Assorted Mixing Containers and Cups - TL-7361/TL-7365
- Gloves - ET-7323
- Xylene for Cleaning - CT-1035
- PermaFlex - PFA-1002/PFA-1014
- PermaFlex Catalyst - P-5826/P-5828
- PermaFlex Accelerator - P-5820/P-5822
- Solvent - CT-1013/CT-1035
- TAV - SI-5852/SI-5860
- LRB - SI-1622/SI-5804
- 2” Paint Brushes - RL-4343
- 4” Roller Cover ⅜” Nap - RL-4323
- 4” Roller Frame - RL-4325
- Mixing Paddle
- Variable Speed Drill
LRB/TAV Tips & Tricks
- LRB/TAV: Never mix in more TAV than 1 part TAV to 2 parts LRB (you can add less TAV for a thinner mix if desired).
Be aware the LRB/TAV mixture will shrink slightly in a few days during curing and any joints, cracks, pits may show a slight concave look.


