Tuscan Slate Instructions
Personal Protection
It’s always recommended to wear the appropriate Personal Protective Equipment (PPE) for the task at hand and follow your employer’s safety policy. Commonly known PPE such as safety glasses, gloves, earplugs, respirators, etc, are recommended as needed.
For further information on OSHA requirements, visit osha.gov
Prep
(For in-depth instructions, see Prep Manual)
- Prep surface to be coated by shot blasting/grinding/acid washing, etc...
- Use appropriate TCP repair products to fill holes, cracks & control joints
- Thoroughly clean surface
- Protect surfaces not to be coated using specialty tape, paper, plastic, etc...
Grout Coat
- Set up mix station
- If spraying, set up and test spraying equipment
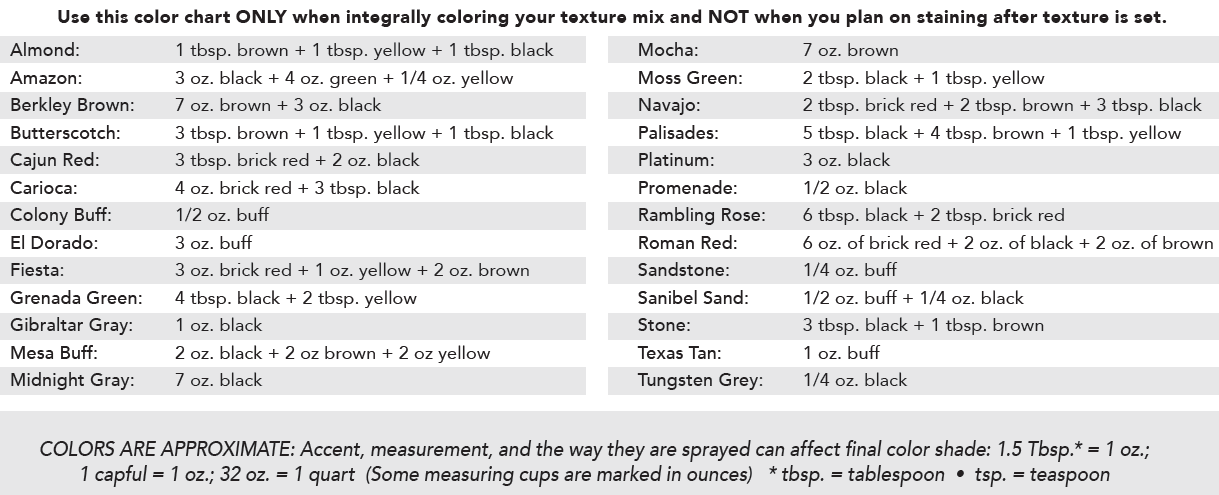
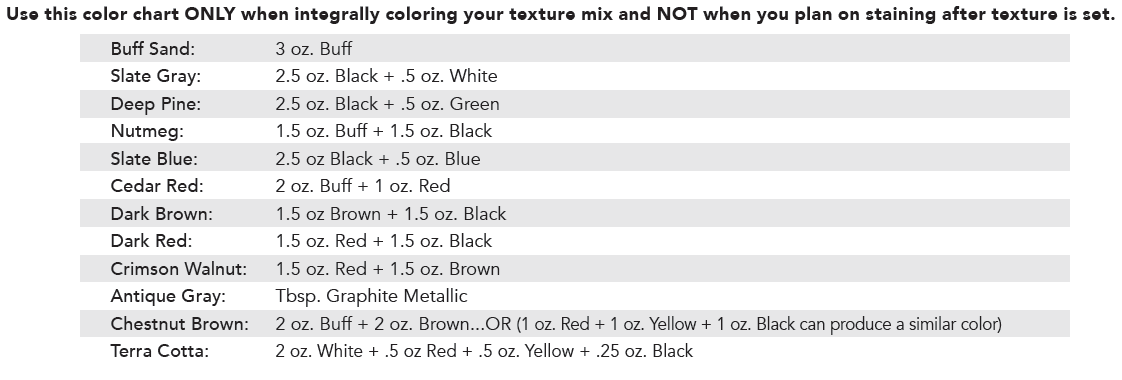
- Using “mixed” HD Resin (1:1 with water), combine “mixed resin” (7-9 Qts.), texture mix (1 Bag), and mineral pigment for desired color. Mix for 3-5 minutes
- Using a magic trowel, or hopper spray gun, apply grout coat over surface
- Let dry
- Address imperfections in grout coat by scraping
- Using stencil tape, tape out design
Texture Coat
- Using “mixed” HD Resin (1:1 with water), combine “mixed resin” (7-9 Qts.), texture mix (1 bag), and mineral pigment for desired color.
- Mix for 3-5 minutes
- Using the end of a metal hand trowel, a cup, drywall bucket scoop, etc…, drop small blobs of texture on grout coat, leaving random spaces
- Using a metal hand trowel, “smear” the texture blobs across the surface, leaving approximately 5%-10% of grout coat showing through
- Let dry
- Address imperfections in texture coat by scraping
- Pull tape
- Remove all dirt and debris from floor
- Apply stain using desired technique
- Let dry
Sealing
Interior
- Apply Neat Coat Epoxy (2 Parts A to 1 Part B)
- Apply desired top coat (Optional)
- Remove all protective specialty tape, paper, plastic, etc
- Make sure project area is clean, presentable, and free from debris
Exterior
- Apply Acrylic Sealer
- Apply 2nd coat of Acrylic Sealer
- Remove all protective specialty tape, paper, plastic, etc
- Make sure project area is clean, presentable, and free from debris
Products & Coverages
- Appropriate Concrete Protector repair products (see repair manual)
- Concrete Protector Texture Mix (150-250 sq. ft. per bag./*Dry Time= 1-6 hours.) - DM-3913
- Concrete Protector HD Resin (Mixes 3-5 bags of texture mix) - DM-5406
- Concrete Protector Mineral Pigment Colorants (1-7 oz. per bag) - DC-2022/DC-2055
Sealer Options
- Barricade 50 Acrylic (mixed 1:1 with approved solvent, 140-200 per. sq. ft. per gal./ *Dry time= 1-3 hrs.) - SE-2807
- Acrylic Shield 25 (140-200 sq. ft. per gal./ *Dry Time= 1-3 hrs.) - SE-2803
- Epoxy Neat Coat (55-120 sq. ft. per gal./ *Dry Time = 8-16 hrs.) - EN-6303
- WB 421 Gloss** (175 -500 sq. ft. per gal./ *Dry Time = 5-7 hrs.) - UT-4501
- WB 221 Satin** (175 - 500 sq. ft. per gal./ *Dry Time = 5-7 hrs.) - UT-4499
- SLV Poly 90**(175 - 250 sq. ft. per gal./ *Dry Time = 4-8 hrs.) - UT-4513
- High Noon Acrylic Floor Finish** (1500 - 3000 sq. ft. per gal./ *Dry Time = 1-2 hrs.) - TJ-3113
- Satin Armor Acrylic Floor Finish**( 1500 - 3000 sq. ft. per gal./ *Dry Time = 1-2 hrs.) - TJ-3125
** Used as an optional top coat with Neat Coat Epoxy
* Coverages and dry times vary depending on application techniques and temperature. Estimations are based on 70 degrees, 30 percent relative humidity. For more information, refer to TDS sheets.
Tools
- Stencil Tape - TP-7517/TP-7521
- 2” Green Specialty Tape - TP-7507
- Mixing Tarps - TL-7235
- Drill Mixing Stand - MX-3253
- Hand Held Mixer - MX-3251
- Mixing Paddle - MX-3245
- ¾” Nap Jumbo Roller Cover - RL-4321
- HD Jumbo Frame - RL-4303
- Assorted Mixing Containers and Cups - TL-7361/TL-7365
- 4”,9”, or 18” Roller Frames - RL-4325, RL-4335, RL-4319
- 4”, 9”, or 18” ⅜” Nap Roller Covers - RL-4323, RL-4341, RL-4313
- Threaded and Tapered Roller Poles - TL-7393, TL-7395
- 2” Chip Brushes - RL-4343
- 16” Stand Up Metal Scraper - TL-7107
- Gloves - ET-7323
- Large Low Viscosity Wand (for mixing epoxy) - TL-7127
- ⅛” Notched Squeegee - ET-7255
- Magic Trowel (18” is a popular size) - TL-7103
- WTF Top Coat Roller - TCR-1001
- Roller End Caps - RL-4317
- 18” Paint Tray - RL-4309
- Spiked Shoes - TL-7353, TL-7349
- Pail Opener - TL-7303
- 2 Gallon Sprayer - TL-7357
- Hudson Never- Pump Sprayer - ET- 7355
- SMK-C100W0L Sprayer - TL-7407
- Low-Speed Drill
- Metal Hand Trowel
- Tape Measures or Pre-Cut Jigs
- 5 Gallon Mixing Buckets
Cost & Pricing
- Typical Product Cost: $1 - $2 per sq. ft.
Typical Pricing: $4.75- $8.00 per. sq. ft.
Benefits & Features
- Super Durable & Easy To Maintain
- Indoor / Outdoor Installations
- Unlimited Color Selections
- Not affected by floods if installed in a basement
- Perfect to be installed over heated slab applications
- Environmentally Friendly & Sustainable
- Application temperatures between 55-95 degrees
Polymer-infused cementitious texture is used to create a permanent decorative finish on any existing concrete surface. Transform your home or business with this high-end looking finish – inside and out. Sidewalks, basement floors, patios, showrooms, porches, commercial areas, pool decks, living areas and more . . .
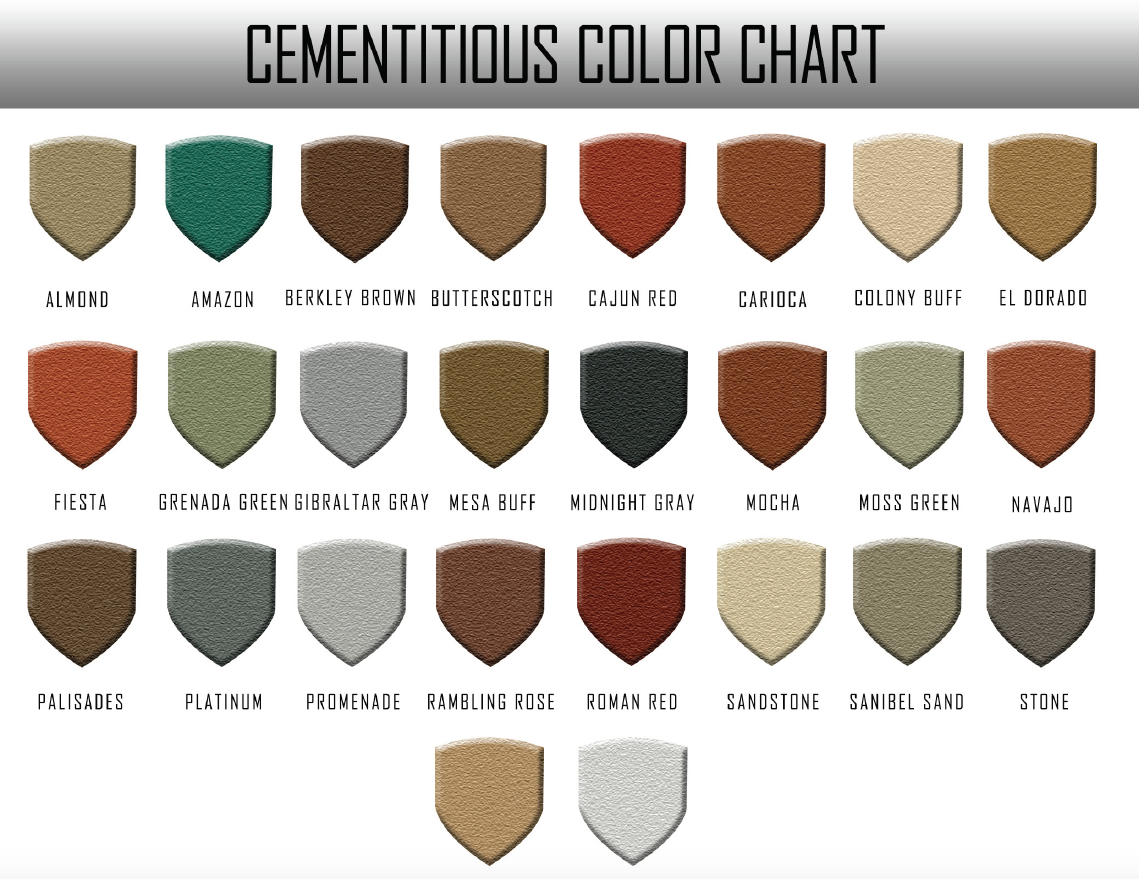
This custom slate texture gives you an authentic look and feel with coloring that resembles hues found only in expensive flooring options (ie: acid stained concrete, upscale ceramic tiles . . .). Integral color variances created with mineral pigments and optional antiquing methods will make the Tuscan Slate finish your preferred concrete resurfacing system!
Tips & Tricks
Resin
Make sure you use cool water to mix your resin (don’t use water that has been baking in the sun all day from a garden hose). Hot mixed resin = faster texture = less fun 😃
Mixed Resin = 1:1 mix of concentrated HD Resin + Water.
When making “Mixed Resin”, do not spray the top of the resin from the nozzle of a garden hose (this will cause the resin to foam and it will take longer to fill properly).
Tools & Masking
Keep your trowels clean. Designate certain trowels for texture and other trowels for epoxy. Magic trowels and hand trowels with dried epoxy or texture on it will not allow you to put your texture down as smooth as possible.
When masking walls, use painter’s tape along the base molding (approximately 1/16” up from the floor). Run ½” stencil tape on top of the base of the painter's tape (this fiber-reinforced tape makes it easier to pull tape when finishing up).
Grout Coat
Most contractors prefer a “looser mix” on the Grout Coat for ease of application with the magic trowel. 9 quarts of mixed resin per bag of texture for this coat is typical.
When applying grout at the recommended square footage, when it is dry, it should feel like sandpaper. Also, DO NOT apply too thick (trying to create “build”) with this coat. This texture is NOT meant to fill or be applied thick.
Wait until the grout coat is completely dry before attempting to design with stencil tape. On interior projects, this means waiting until the next day.
Designs
Tile, Diagonal Tile or Ashlar Slate designs are the most common designs done. With that being said, a completely seamless Tuscan Slate (no taped design . . . just texture and color) is a great system to sell in some situations. For example, a sidewalk with control cuts every several feet may look less “busy” with no design at all. You may want to sell it and explain it as looking like “large pieces of slate” in each area (between each control cut/expansion joint).
Speaking of control cuts and expansion joints, on exterior projects you are honoring any existing control cuts/expansion joints (you are not filling them in).
Tile and Diagonal Tile designs are best sold as larger tile 24” - 36”. The bigger the tile, the less taping you have to do laying out the design!
Ashlar Slate design is random squares and rectangles.
Borders taped out around the edges of the slab can make for a nice decorative touch (if that is what your client is desiring). Borders can be textured with a different integral color mix or stained a different color after it is dry. A Diagonal Tile pattern, Ashlar Slate pattern or seamless Tuscan Slate on the interior of the border all look great!
Texture Coat
Most contractors prefer a slightly “thicker mix” on the Texture Coat compared to the Grout Coat. 7.5 - 8 quarts of mixed resin per bag of texture for this coat is typical.
If doing a design, make sure to do 100% coverage over design lines in order to highlight grout lines. However, it should be applied thin enough as to slightly see the tape lines through the texture.
Once you’ve coated the floor in an area and the texture begins to look dull (it starts losing its “wet sheen” look as it starts to dry), get down on your knee pads and move the trowel randomly around the texture on the floor.
When applying blobs of texture to the surface, drop them no more than 3 feet away so you can easily reach with your trowel to knock them down.
When knocking down texture, don’t hold your trowel flat (slightly tilt the trowel up on edge as you move it across the surface). By doing this, you are “knocking down” and flattening the blobs of texture, closing up the surface and leaving behind limited “open spaces”.
Don’t move your trowel in a “windshield wiper” type of motion (you will be able to see all of the texture moving in the same pattern/direction if you do).
If multiple people are troweling on the project, switch back and forth with each other every few minutes (everyone has their own unique troweling technique and if you stay on one side of the slab while someone else is always on the other side, you will be able to see a distinct texture difference between the two areas).
Practice makes perfect! 😉 Practice on sample boards and/or your own concrete to make sure you get the technique down.
Sell projects off of something you’ve done (ie, sample boards where you know the technique and coloring recipe).
When removing stencil tape, put pressure and pull on the tape towards
you as you lift up the lines of tape. IF you pull/bend the
tape over against the texture, you will leave many strands of tape
fiber embedded (and you’ll have to spend a bunch of time trying to
scrape it out).
When sweeping and vacuuming up the debris from scraping and pulling tape, DO NOT ROLL YOUR VACUUM across the floor. You may (and probably will) leave marks. PICK UP the vacuum, set it down and repeat this process as you need to.
Staining
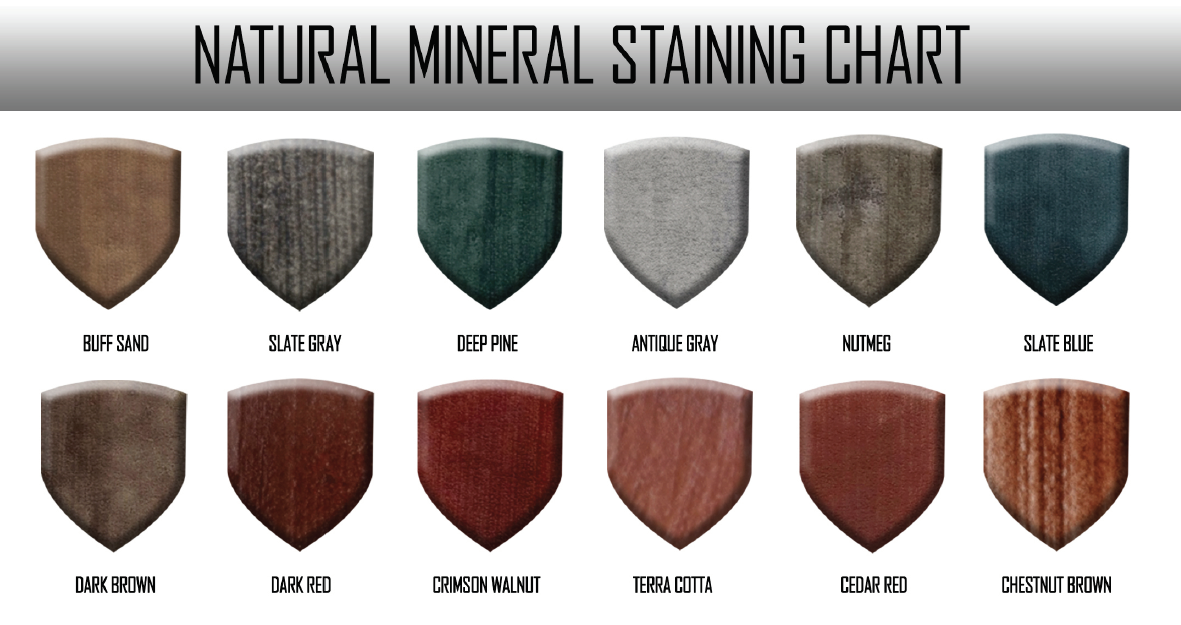
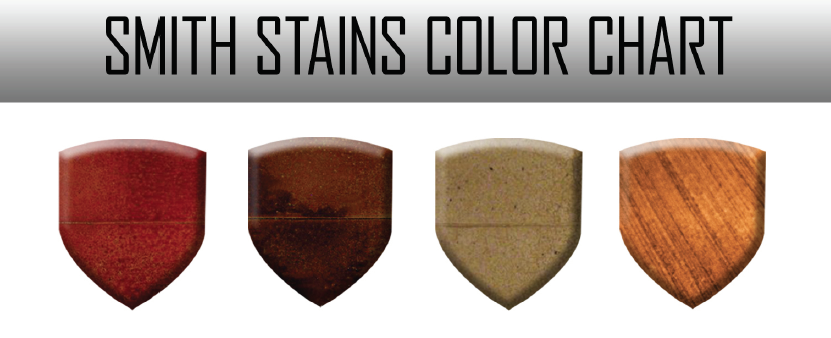
Pump up sprayers (or better yet our SMK sprayers) work great to spray stain over your texture. There are multiple techniques to stain: 2-3 colors sprayed “wet-on-wet” or one stain followed by another after the first one has dried. The biggest thing to remember is to start light (you can always apply more). Practice on sample boards ahead of time to get the look you are going for.
The reason we typically go with a dark grout coat is to allow us to pull stencil tape and stain by allowing the stain to flow to the low areas.
Light-colored grout lines require different techniques for staining (not staining to slight puddling). Leaving the tape on and spraying stain to puddling will still have stain bleed under the tape and on the light-colored grout lines. Leaving the tape on and staining with HVLP or airless sprayers would be required (or individually staining tile or other designs with foam brushes).
The stain needs to be completely dry before sealing.
Sealing
Exterior Sealing
Work in smaller areas. Roll out sealer and then crosshatch without redipping. “Thin to win”.
Seal when surface temps are steady or going down (evening is typically a good time to seal). When slab temps are increasing, concrete is breathing out and bubbles can happen. When slab temps are decreasing, concrete in breathing in / sucking the sealer into it.
If you see “spiderwebbing” in the acrylic sealer while rolling, it means that area is already drying or your roller is dry.
Wait until the first coat is dry before applying the second coat (you don’t want to step in sticky sealer and cause discoloration or damage to your uncured coating.)
Interior Sealing
Neat Coat epoxy is ideal for “build” to smooth out the low areas. It can be applied anywhere from 55 sq. ft. per gallon and higher. Applying at 55 - 65 sq. ft. per gallon is obviously going to give you more build and a smoother surface than when applied at 100 - 120 or more sq. ft. per gallon. With that being said, many clients like the texture of Neat Coat applied at 90 - 100 sq. ft. per gallon, but if they are wanting a completely smooth floor (they want to see the texture but not feel it), you’ll have to apply and charge for 2 thicker “build” coats.
The MOST IMPORTANT TIP WHEN USING EPOXY: “OUT OF THE BUCKET AND ONTO THE FLOOR.” Leaving the epoxy too long in the bucket will cause it to heat up and start smoking. DO NOT POUR HOT EPOXY ON YOUR PROJECT.
Use The Concrete Protector’s large low viscosity mixing wand for mixing Neat Coat Epoxy. This is the correct mixing wand to ensure that you are not whipping air into your epoxy.
Whenever you break a kit, you must premix Part A for 3 minutes BEFORE pouring out of the bucket.
1.5 - 3 mixed gallons at a time is a typical amount to work with.
Do not use a high-speed drill. Do not mix so fast that you get the “tornado effect” in the product as it spins around the bucket (at this speed, you may suck air down into the epoxy . . . potentially entrapping it and possibly causing bubbles).
Make sure the room is at a steady temperature or the temperature is on the decrease when applying the epoxy. A room with floor temps rising while curing may cause the slab to breathe out and possibly cause outgassing bubbles.
Do whatever it takes to control room temps. If it means putting aluminum foil on the windows to block and reflect the sun, then do it.
Use the appropriate labor force for the job that you’re doing. Most residential projects may require 3 workers. One person dedicated to mixing only. One person as your “runner”, taking buckets of mixed epoxy from the mixing area to the floor, and one person as the main applicator/finisher.
Make sure you have a “mixing bucket” and a” job bucket”. When mixed epoxy is poured into your job bucket, make sure that the job bucket is sitting on a clean surface.
IF wearing spiked shoes when applying your epoxy, make sure you are wearing dull or rounded spikes. Sharp spikes + a heavy installer = floor damage. Consider investing in rubber sport cleats if you need to walk in your epoxy while installing.
Repairs if needed:
Scratches in epoxy: Using a non-scratch Scotch Brite pad, rub surface, then clean to see if that removes the scratch. You may then have to “spot wax” with our acrylic floor finish (High Noon or Satin Armor Floor Finish) . . . only if necessary.
If there is a deeper scratch and the Scotch Brite pad/wax doesn’t do the trick, use 220 grit sandpaper or screen (or higher) to lightly sand the spot/area then 1 - 3 coats of acrylic floor finish.
Color Charts
