Graniflex Instructions
Personal Protection
It’s always recommended to wear the appropriate Personal Protective Equipment (PPE) for the task at hand and follow your employer’s safety policy. Commonly known PPE such as safety glasses, gloves, earplugs, respirators, etc, are recommended as needed.
For further information on OSHA requirements, visit osha.gov
Prep
(For in-depth instructions, see Prep Manual)
- Prep surface to be coated by shot blasting/acid washing, etc
- Use appropriate TCP repair products to fill holes, cracks & control joints
- Thoroughly clean surface
- Protect surfaces not to be coated using specialty tape, paper, plastic, etc...
Prime Coat
- Set up mix station
- Pre-mix PermaFlex until well blended
- Add correct measurements of PermaFlex Catalyst (1.6 oz. per 1 gal.), and PermaFlex Accelerator (6.4 oz. per 1 gal. for slow set/ 12.8 oz. per gal. for fast set), mix until well blended
- Add desired amount of solvent (10%-20% by volume), mix until well blended
- Pour mixed product on floor in a ribbon pattern
- Wearing spiked shoes and using a 1/8” notched squeegee, spread PermaFlex on floor
- Using a 3/8” nap roller, backroll for consistent coverage
- Let dry
(Optional) LRB Flood Coat (10%-15% water + LRB Catalyst)
Broadcast Coat
- Pre-mix PermaFlex until well blended
- Mix in correct measurements of PermaFlex Catalyst (1.6 oz. per 1 gal.),
and PermaFlex Accelerator (6.4 oz. per 1 gal. slow set/ 12.8 oz. per gal. fast set) mix until well blended - Mix in desired amount of solvent (10%-20% by volume) until well blended
- Pour mixed product on floor in a ribbon pattern
- Wearing spiked shoes and using a 1/8” notched squeegee, apply PermaFlex on floor
- Using a 3/8” nap roller, backroll for consistent coverage
- Broadcast Color Flakes
- Let dry
- Using a leaf blower or broom and dustpan, collect excess flakes
- Using a 16” Stand Up Metal Scraper, scrape the entire floor in one direction, then cross-hatch
- Using a vacuum, remove all dirt and excess color flakes from floor
Sealing
Interior
- Apply desired sealer
- Apply desired top coat (optional)
- Remove all protective specialty tape, paper, plastic, etc...
- Make sure project area is clean, presentable, and free from debris
Exterior
- Apply desired sealer
- Apply 2nd coat of sealer
- Remove all protective specialty tape, paper, plastic, etc...
- Make sure project area is clean, presentable, and free from debris
Products & Coverages
- Appropriate Concrete Protector repair products (see repair manual)
- Xylene - CT-1035
- Acetone - CT-1013
- LRB (40 ft. per gal./ *Dry Time= 4- 6 hrs) - SI-1622/SI-1624
- PermaFlex (200-260 sq. ft. per gal. *Dry Time= 1- 8 hrs.) - PFA-1002/PFA-1014
- PermaFlex Catalyst - P-5826/P-5828
- PermaFlex Accelerator - P-5820/P-5822
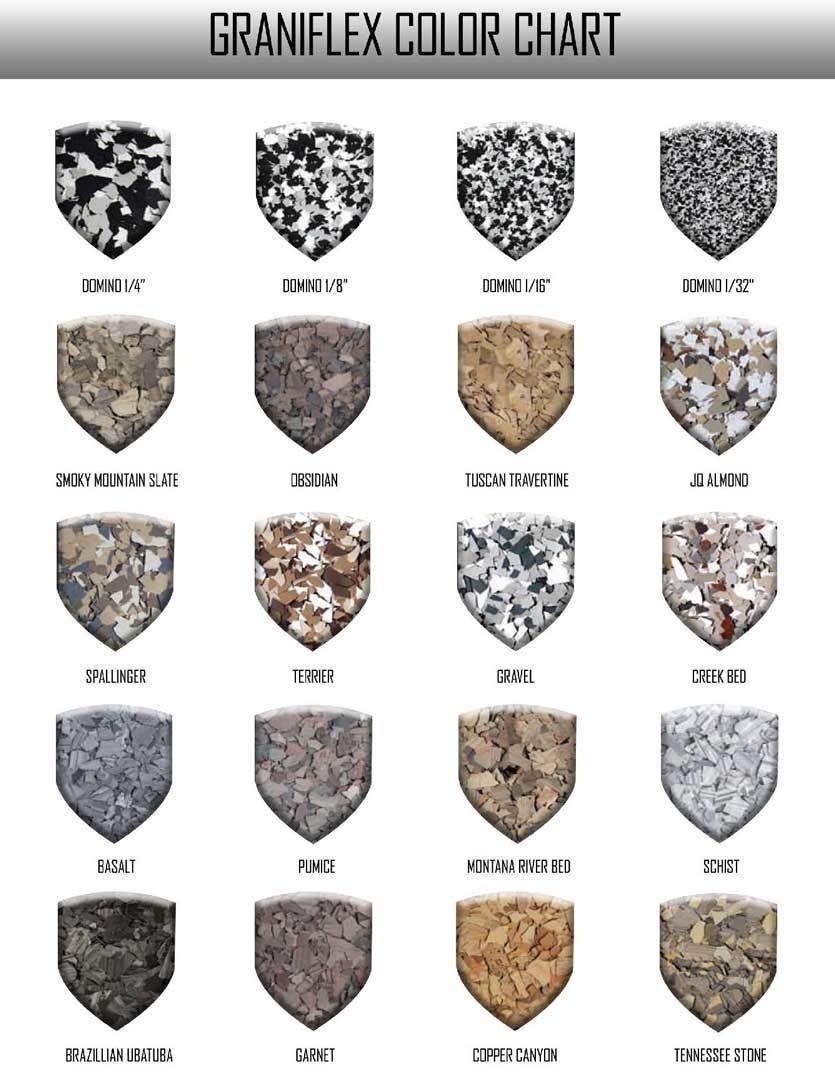
- CP Color Flakes (5-7 ft. per pound)
Sealer Options
- Epoxy Neat Coat (55-70 sq. ft. per gal./ *Dry Time = 8-16 hrs.) - EN-6303
- WB 421 Gloss** (175 - 500 sq. ft. per gal./ *Dry Time = 5-7 hrs.) - UT-4501
- WB 221 Satin** (175 - 500 sq. ft. per gal./ *Dry Time = 5-7 hrs.) - UT-4499
- SLV Poly 90**(175 - 250 sq. ft. per gal./ *Dry Time = 4-8 hrs.) - UT-4513
- High Noon Acrylic Floor Finish** (1500-3000 sq. ft. per gal./ *Dry Time = 1-2 hrs.) - TJ-3113
- Satin Armor Acrylic Floor Finish**(1500-3000 sq. ft. per gal./ *Dry Time = 1-2 hrs.) - TJ-3125
- GraniSeal (160-240 sq. ft. per gal./ *Dry Time= 1- 2.5 hrs.) - UT-4403/UT-4401
- Perfect Poly 90 (100-200 sq. ft. per gal./ *Dry Time= 1- 2.5 hrs.) - UT-4515/UT-4527
** Used as an optional topcoat with Neat Coat Epoxy
* Coverages and dry times vary depending on application techniques and temperature. Estimations are based on 70 degrees, 30 percent relative humidity. For more information, refer to TDS sheets.
Tools
- 2” Green Specialty Tape - TP-7507
- Mixing Tarps - TL-7235
- Assorted Mixing Containers and Cups - TL-7361/TL-7365
- 4”,9”, or 18” Roller Frames - RL-4325, RL-4335, RL-4319
- 4”, 9”, or 18” 3/8” Nap Roller Covers - RL-4323, RL-4341, RL-4313
- Threaded and Tapered Roller Poles - TL-7393, TL-7395
- 2” Chip Brushes - RL-4343
- 16” Stand Up Metal Scraper - TL-7107
- Gloves - ET-7323
- Large Low Viscosity Wand - TL-7127
- 1/8” Notched Squeegee - ET-7255
- WTF Top Coat Roller - TCR-1001
- Roller End Caps - RL-4317
- 18” Paint Tray - RL-4309
- Spiked Shoes - TL-7353, TL-7349
- Pail Opener - TL-7303
- Pulse Bac Vacuum - PB-7211/PB-7215
- 18” Magic Trowel - TL-7103
- Leaf Blower/ Push Broom
- Dustpan
- Variable Speed Drill
- 5 Gallon Mixing Buckets
- Mixing Paddle
Cost & Pricing
- Typical Product Cost: $2.30 - $3.50 per sq. ft.
- Typical Pricing: $6.50 - $9.50 per sq. ft.
Benefits & Features
- Beautiful granite-like resurfacing
- Fast turn-around times
- Landscaping isn’t torn-up like a typical concrete tear-out & replacement
- Unlimited color options with flake color blends and designs
- Less expensive than replacement
- Unique...not the same old gray
GraniFlex is a flexible and beautiful rubber membrane system. Perfect
application for pool decks, driveways, sidewalks, patios, porches, garage floors, basement floors, kitchen areas, restrooms, living areas and more.
Useful for both exterior or interior! The flexible penetration technology
of this product never gets brittle over time and cures as tough as truck
tires INSIDE the capillaries of your concrete. 1000’s of colorful flake
combinations.
Tips & Tricks
- OPENING BUCKETS:
A five-gallon pail of Permaflex has a deep lid (compared to the one-gallon pail of Permaflex) and it is hard to remove . . .
UNLESS, you use the following method to remove it:
•With a utility knife, cut every 2.5 - 3 inches around the lid and then use a plastic pail opener to remove. - EXAMPLES OF AN EASY WAY TO MIX:
• After removing the lid, premix your Permaflex to color consistency
• Pour half of the pail of Permaflex into another same-sized pail (visually verify equal amounts in each pail)
• Open the catalyst associated with the Permaflex (an 8 oz bottle for a 5-gallon pail and a 1.6 oz bottle for a 1-gallon pail) and pour half of that bottle into your split Permaflex (visually verify half of the bottle).
• Open the accelerator associated with the Permaflex (a 32 oz bottle for a 5-gallon pail and a 6.4 oz bottle for a 1-gallon pail) and pour half of that bottle into your split Permaflex if your objective is “Regular Acceleration”. (If your objective is “Double Acceleration”, pour the complete bottle of accelerator in).
• Mix for 30 - 45 seconds
• Add solvent (typically 10 - 20% by volume).
• Mix for another 2 mins. or so until well blended - ACCELERATOR:
The “slow-set” or “regular-set” time is 4-6 hours (and is what you get when you add the accelerator that automatically comes along with your Permaflex). This slow set amount is 5% accelerator by volume (6.4 oz of accelerator per gallon).
Additional accelerator can be purchased to speed up set time to a 1-2 hour set time (“fast-set”). Humidity in the air is the biggest factor on speed of set . . . the more humidity, the faster the PermaFlex sets!
10% accelerator by volume is considered “fast-set” (12.8 oz of accelerator per gallon). - SOLVENT:
Extra solvent may be required when slab temps are extremely cold. Permaflex hitting a cold, cold slab will thicken and make it harder to work with. Consider going with high solvent percentages (not exceeding 25% solvent by volume. - LONG POT LIFE:
PermaFlex will not completely solidify in your pail during your application. After Catalyzed and Accelerated it can only form a skin on the surface (needing removed) and/or thicken up a bit if application is long delayed. Just thin it down again and you’re ready for application! - PRIME COAT:
You can either “dip and roll” your prime coat (out of an 18” paint tray) or pour it out, squeegee (using an 1/8” notched squeegee) and then back roll evenly with an 18” 3/8” roller cover. You are going for 240 sq ft per gallon.
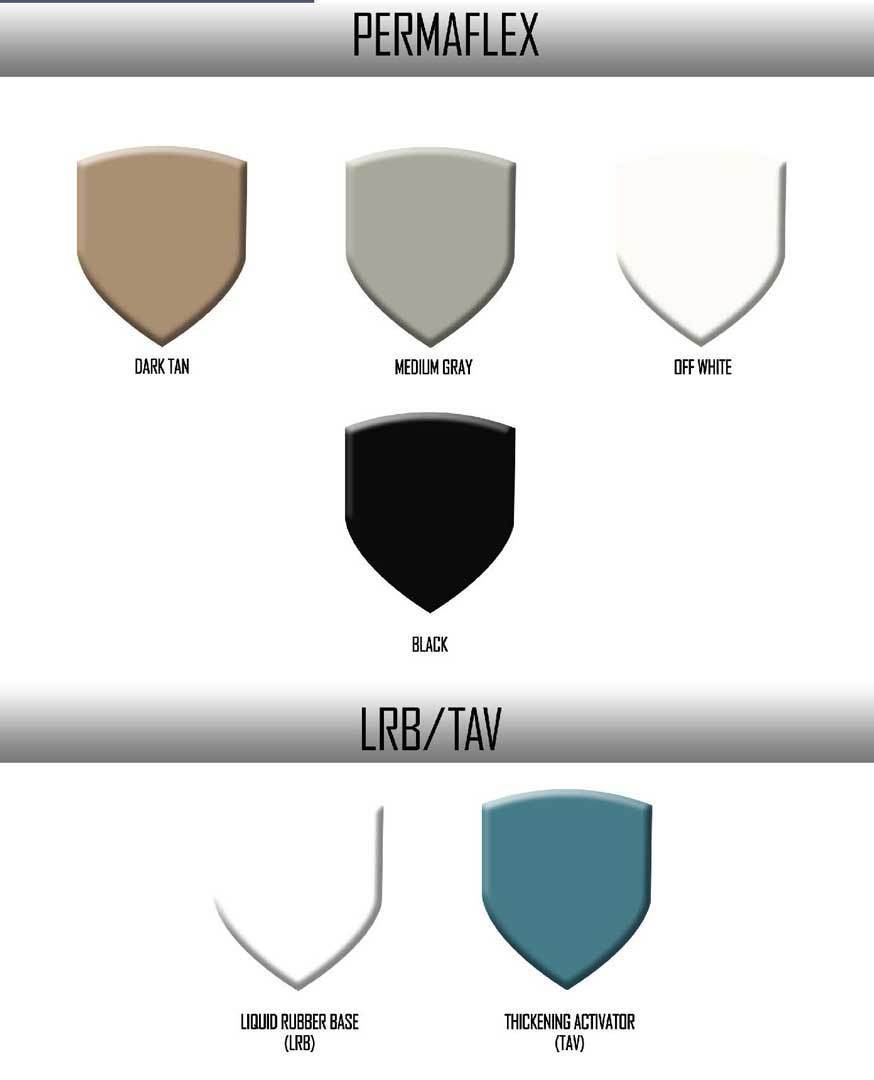
Permaflex is not like paint where it goes on one color and dries another color (Permaflex goes on one color and stays that color). A great idea is to tint your prime coat a slightly different color. For example, adding 3 to 4 oz of another color of Permaflex per gallon is a good way to shift the color (many contractors will add 8 oz of Black Permaflex to each 2.5 gallons of Permaflex to tint). - BUBBLES:
If outgassing occurs (bubbles) it is advised to reroll (even if extremely tacky) to allow the bubbles to lay out. - BROADCAST COAT:
You can apply Permaflex the same way on this coat but it may be advised to “dip and roll” this coat before broadcasting to ensure a thin, even coat.
What you DON’T want to have happen is to make up your Permaflex a bit on the thick side, pour it out and then fail to roll it out evenly (which can happen to inexperienced installers). If this happens, then there is a chance of your Permaflex penetrating up around your flakes in the thick spots on the floor and making the floor look blotchy.
With our color flakes there are endless color combinations and endless possibilities!


